Wednesday, March 27, 2013

Table Talk - Sauteed Boneless Pork Chops with quick Chutney

This is our latest recipe from the America's Test Kitchen Healthy Cookbook.  I like pork but I wasn't too sure about the chutney...I decided to half this recipe, since I was sure Jonathan wouldn't be interested in eating any of the chutney. 

I went ahead an brined the pork for 30 minutes in the salt and sugar solution (which I halved). 

I didn't really notice any difference and with the chutney that tends to be the dominate flavor anyway so I'd skip this step next time, if there is a next time.

 After soaking for 30 minutes I dried off the pork and seasoned it with salt and pepper.  I'm surprise the recipe said to season it after brining it.  Seems redundant...
Next I cooked the pork in a little oil.  The picture below is after 3 minutes and flipping the meat.
 After 5 minutes on the second side I pulled all the pork out and tented it.
I turned of the stove while I prepared the chutney.

Step one - peel & dice the apples and mince the onion. 
 I dumped that into the pot, covered it, cooked for about 8 minutes to soften the apples and onions.  While that cooked I got the rest of the ingredients ready. 
 I really, really don't like ginger so I left that out.  I remembered to half all the ingredients except the apple juice ( I didn't have cider), so my chutney stayed pretty running even after letting it cook down quite a bit. 
 The taste was better than I was expecting!  I've always liked applesauce with pork.  But I think the recipe gives you a lot more chutney than you'd really want or need.  Instead of complimenting the pork you pretty  much lose the flavor of the pork.  All you taste is the chutney.  Other than the texture of the pork I don't even notice it. 
 Also, if I make this again I'll leave out the cayenne pepper.  That just gives it some heat that hits at the end of the bite.  Since I'm not much for spicy heat it doesn't add anything to the recipe to me. 

Overall, if you like pork and you are looking for something that's quick and easy to go with it, I'd recommend this recipe. 

For the full recipe check out Michelle's blog. 


Sunday, March 24, 2013

Pull Apart Bread

I found out late on Saturday that we were having a linger longer after church on Sunday.  I thought about making a treat - my preferred baking items, but since it was a true potluck (everyone was just bringing whatever they wanted to share) I was worried we've be heavy on the desserts.  So I decided to make some kind of bread product.  Turns out we only had three desserts... so I could have made something more to my liking.  But Jonathan really enjoyed this. 

This is a recipe I got from a friend two wards ago.  It's really easy and super yummy!  The recipe calls for three different rise times, but you can skip the second one if you're in a hurry.  The dough recipe is really similar to other roll recipes, the difference is how you put it together. 

I use my stand mixer.  I start by just mixing the water, yeast, sugar & salt together. 

 Then I add the flour, one cup at a time.  Mixing between each cup. 
 
 This time around I only needed 5 cups.  You can tell you have enough flour when the dough all comes together and starts to climb up the dough hook.  It might be a little sticky but you can work in a bit more flour when you roll it out.

I let it rise the first time for an hour.  Then I punched it down.
 After I punched it down I pulled the dough together over the hole and turned it in the bowl.  I let it rise a second time for about 45 minutes.
 It doubles again...
 Next I rolled the dough out.  I try to get it to about an 1/8" thick.  I use a good amount of flour on the counter so I can get the dough pieces off easily.
 Then I just use my pizza cutter to cut it into rows and then pieces. 
I don't worry too much about getting the pieces even at all.  I just try and keep them all smaller than about an 1". 
 
Then I melt a cube of butter and pour it into the bottom of the baking dish (13x9").  Then I just layer all the pieces in.  I try to keep it pretty random.  I like to have the butter layer mostly covered before I start the second layer.  

 At the end you just have a pile of dough pieces in the pan. 

I let this rise one more time, about 30 minutes this time, until the dough is about even with the edge of the pan.  Then it's into the oven for 20 - 30 minutes. 
 After baking the tops are warm and golden brown.  The lower pieces are perfectly buttery, and the top pieces are chewy and crisp. 
It's a delicious bread.  I could eat the whole pan myself, but if you restraint yourself and get 16 servings out, the calories work out as below.
Here's the recipe in an easy form to copy and print out.


Pull Apart Bread

2 cups luke-warm water
2 tablespoons yeast
½ cup sugar
2 teaspoons salt
4 – 6 cups flour
8 tablespoons butter


Mix water, yeast, sugar and salt in a stand mixer with dough hook.  Gradually add flour, one cup at a time, until dough forms a ball and isn’t sticky.  Cover the dough.  Let rise until double (about an hour), punch down the dough, cover and let rise again (about 45 minutes).  Melt butter and pour into a 13x9” pan.  Roll out the dough and cut into 1” strips.  Add strips to the pan with butter in it.  Just place the strips in the pan randomly.  Cover the pan with plastic wrap and let rise again (about 30 minutes).  Bake at 350 degrees for 20 – 30 minutes until browned. 

Saturday, March 23, 2013

Bake 52 Rewind - Week 11 Ciabatta Bread

This latest baking recipe was very interesting to me.  It was a lot of steps, over a long time but in the end it only had 3 ingredients - flour, yeast & salt! 
You start out by making a sponge out of flour, yeast & warm water.  I did this on Saturday because the sponge has to sit for at least 6 hours and up to 24 hours.  I mixed everything together and covered the bowl with plastic wrap and left it.
The next day I could see that it had risen.
But I was never sure if it fell.  But after about 22 hours I decided to get the rest of the bread started.

For the dough I mixed flour, yeast, warm water and salt. 

I covered the bowl and let it sit for 20 minutes.  Then I got ready to add the sponge.
 
Once I uncovered the bowl I could see that it had fallen.  It's hard to tell because the stuff on the sides still is as high as it got but the middle is lower. 
Next I mixed 3 - 5 minutes
 
 I ended up with some pretty sticky dough.  I scraped the dough into another bowl and covered the bowl with plastic wrap.

I put it in the bathroom to rise.  It's the warmest room in the house. 

After an hour I sprinkled the dough with flour and "turned" the dough.

I had not idea if I was doing this right.  I used a little scraper (that I normally wash dishes with) because my dough scraper is metal.  I just kept pulling the edges over until I incorporated the flour. 

The cookbook has very detailed instructions for how to "fold" the dough, which I didn't follow but this seemed to have worked out okay. 

The bowl was covered again and went back in the bathroom for the second rise.  It was supposed to triple in an hour.  I think it came pretty close...

Next I got the backing pans ready.  I sprinkled dough over the counter and over two inverted baking trays.  Once again the recipe had very specific instructions for shaping the dough into loaves.  I just sort of manhandled it until I felt like it was good enough.
Now it was time for the 3rd rise!  After an hour and a half it was finally ready to go in the oven. 
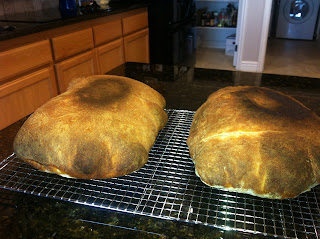
The recipe said to preheat a baking stone in the oven for a half hour, then move the dough onto the stone using the parchment paper.  The stone was on the rack on the lowest level of the oven.  The recipe said to bake on one side for 20 minutes, then flip and cook another 20.  For the first loaf I checked it after about 15 minutes.  It looked pretty done so I flipped it.  The bottom looked great.  After about 10 more minutes I checked it again.  It was already burnt!!  :-(
So for the second loaf I moved the rack up to the second to the bottom rack level.  I cooked the first side for only 10 minutes and then flipped it.  I cooked the second side for only 10 more minutes and it was still a bit too dark.
Bummer...  I was worried the bread wouldn't even be done on the inside. But it was.

 I tossed the first loaf, but the second one was really good.  Jonathan thought it still tasted burnt.  It didn't to me.  Other than the first piece I've eaten the whole second loaf.  I keep just having bread for dinner!  :-) 

While this recipe seemed long, it wasn't particularly difficult difficult, you just ended up tied to the house for 48 hours.  If you like bread I would recommend you try this.  Just don't put your oven rack on the very bottom position, and check on it after 10 minutes.  :-)
Find the complete recipe here.

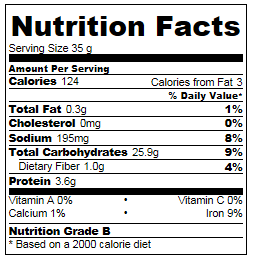
I did the calories based on 12 pieces per loaf.

Thursday, March 21, 2013

Reese's Minis Peanut Butter Bars

So it wasn't until after I made these that I realized these are the second peanut butter bars I made in one weekend.  I must have a real peanut butter fetish this spring...

This recipe starts with peanut butter, butter and sugar - good start!


Next I added in the eggs, salt and vanilla
I used 1/3 a teaspoon of salt for the 1/4 teaspoon plus a big pinch. 
I have this set of measuring spoons that has everything from 2 tablespoons down to 1/8 teaspoon.  I love it!

Next step flour - just enough to stiffen up the dough.

Next the goodies...

I was sure I had peanuts.  We buy big containers of them from Costco for Jonathan to snack on and I had just seen a container.  But when I went to get them I couldn't find them anywhere!  Jonathan must have taken them with him on his trip to Utah for snacking.  So I used peanut butter chips instead.  Three kinds of chips - white chocolate, dark chocolate and peanut butter!

I mixed that all by hand and then pressed the dough into a 13x9" pan.


In to the oven... 

My grocery store was all out of mini Reese's peanut butter cups, of all the luck!  So I bought Reese's miniature peanut butter cups.  So unwrapped a bunch (probably a dozen or so) quartered them so I got a cup. 


As soon as the bars came out of the oven I spread the quartered Reese's miniatures across the top and then added the Reese's Pieces.

 
Of the two peanut butter recipes I made I think it I like this one best.  This latest one is a lot like a peanut butter blondie.  Also, if I made it again I think I'd put the Reese's pieces on for the last few minutes of baking, so that they melted a little and stuck to the top.  The miniatures melted just a bit and stuck nicely.  But the pieces just fall off as soon as you pick up a piece. 
 
If you cut the bars into 31 pieces the calories aren't too bad...


Tuesday, March 19, 2013

Red Velvet Gooey Butter Cookies

I had to make a snack to take to Relief Society this week.  I was looking through all the recipes for treats I've saved to make and this recipe caught my eye.  It's just pretty...

It's a pretty simple recipe since you use a cake mix.  It starts with 8 oz of cream cheese and a cube of butter.  This is not a low fat recipe...

 
I whipped those until they were smooth and fully blended.

Then I beat in the egg and vanilla.  And then I added the cake mix, red velvet.

 
I love how RED the dough is.  The white chocolate chips really stand out. 

This was a really, really sticky, thick dough.  I didn't really like the flavor of the raw dough.  Too much tartness from the cream cheese. 

I ended up with 30 cookies from the dough.
I cooked both trays at once, rotating them half way through.  I only cooked them for about 11 minutes.
The final cookie was pretty good.  I couldn't taste the cream cheese at all... I don't know if that is a good thing or a bad thing.  The cookies are more cake-like and chewy, which I should have expected given the ingredients.  Either way I ended up with a very pretty dessert!